Just Another Mom HQ

Just another Mom's guide to a healthy lifestyle

  • Home
  • Recipes
  • Essential Oils
    • Visit My Oils Page
  • All Natural Products
  • Sydi’s Blog
You are here: Home / Page Templates / Blog Page

Spiralized Apple Crisp with Date Caramel

Crisp, is one of the easiest desserts in the whole world!   In fact when my kids ask for pie I always try to convince them crisp is better.  Don’t get me wrong I can make pie crust, but I really don’t have a lot of time on my hands so…crisp is my go to. The hardest part of this Apple Crisp is prepping the apples, and since that isn’t hard at all that makes this dessert easy as pie…ahem crisp.

I chose to spiralize my apples for this crisp, feel free to use sliced apples if you prefer.  The spiralizer is perfect for apples as you don’t even need to core them!  Just secure in your spiralizer and crank away.  In a recent spiralizer cooking class I taught I really loved this spiralizer by OXO.  In a recent spiralizer cooking class this spiralizer secured to the counter top better than its competitors making it easier to use.

Once your apples are prepared and ready to go toss with the balance of apple ingredients and pile in an oiled baking dish.  You’ll see I haven’t used any refined sugar in this recipe (and most of my recipes…). Instead we are replacing all sugar with coconut sugar.  It has a nice almost molasses flavor and has been shown to not spike your glycemic index the way that refined sugar would.

With your apples all spiralized and ready for fun, mix all crisp ingredients together and top apples with it spreading evenly being sure to fully cover apples.  Spiralizing your apples also make this a super fun dessert for kids as it is like eating apple noodles if you don’t trim them.  If longer spiralized apples isn’t your jam, no worries go ahead and snip them with a pair of kitchen shears as you finish spiralizing.

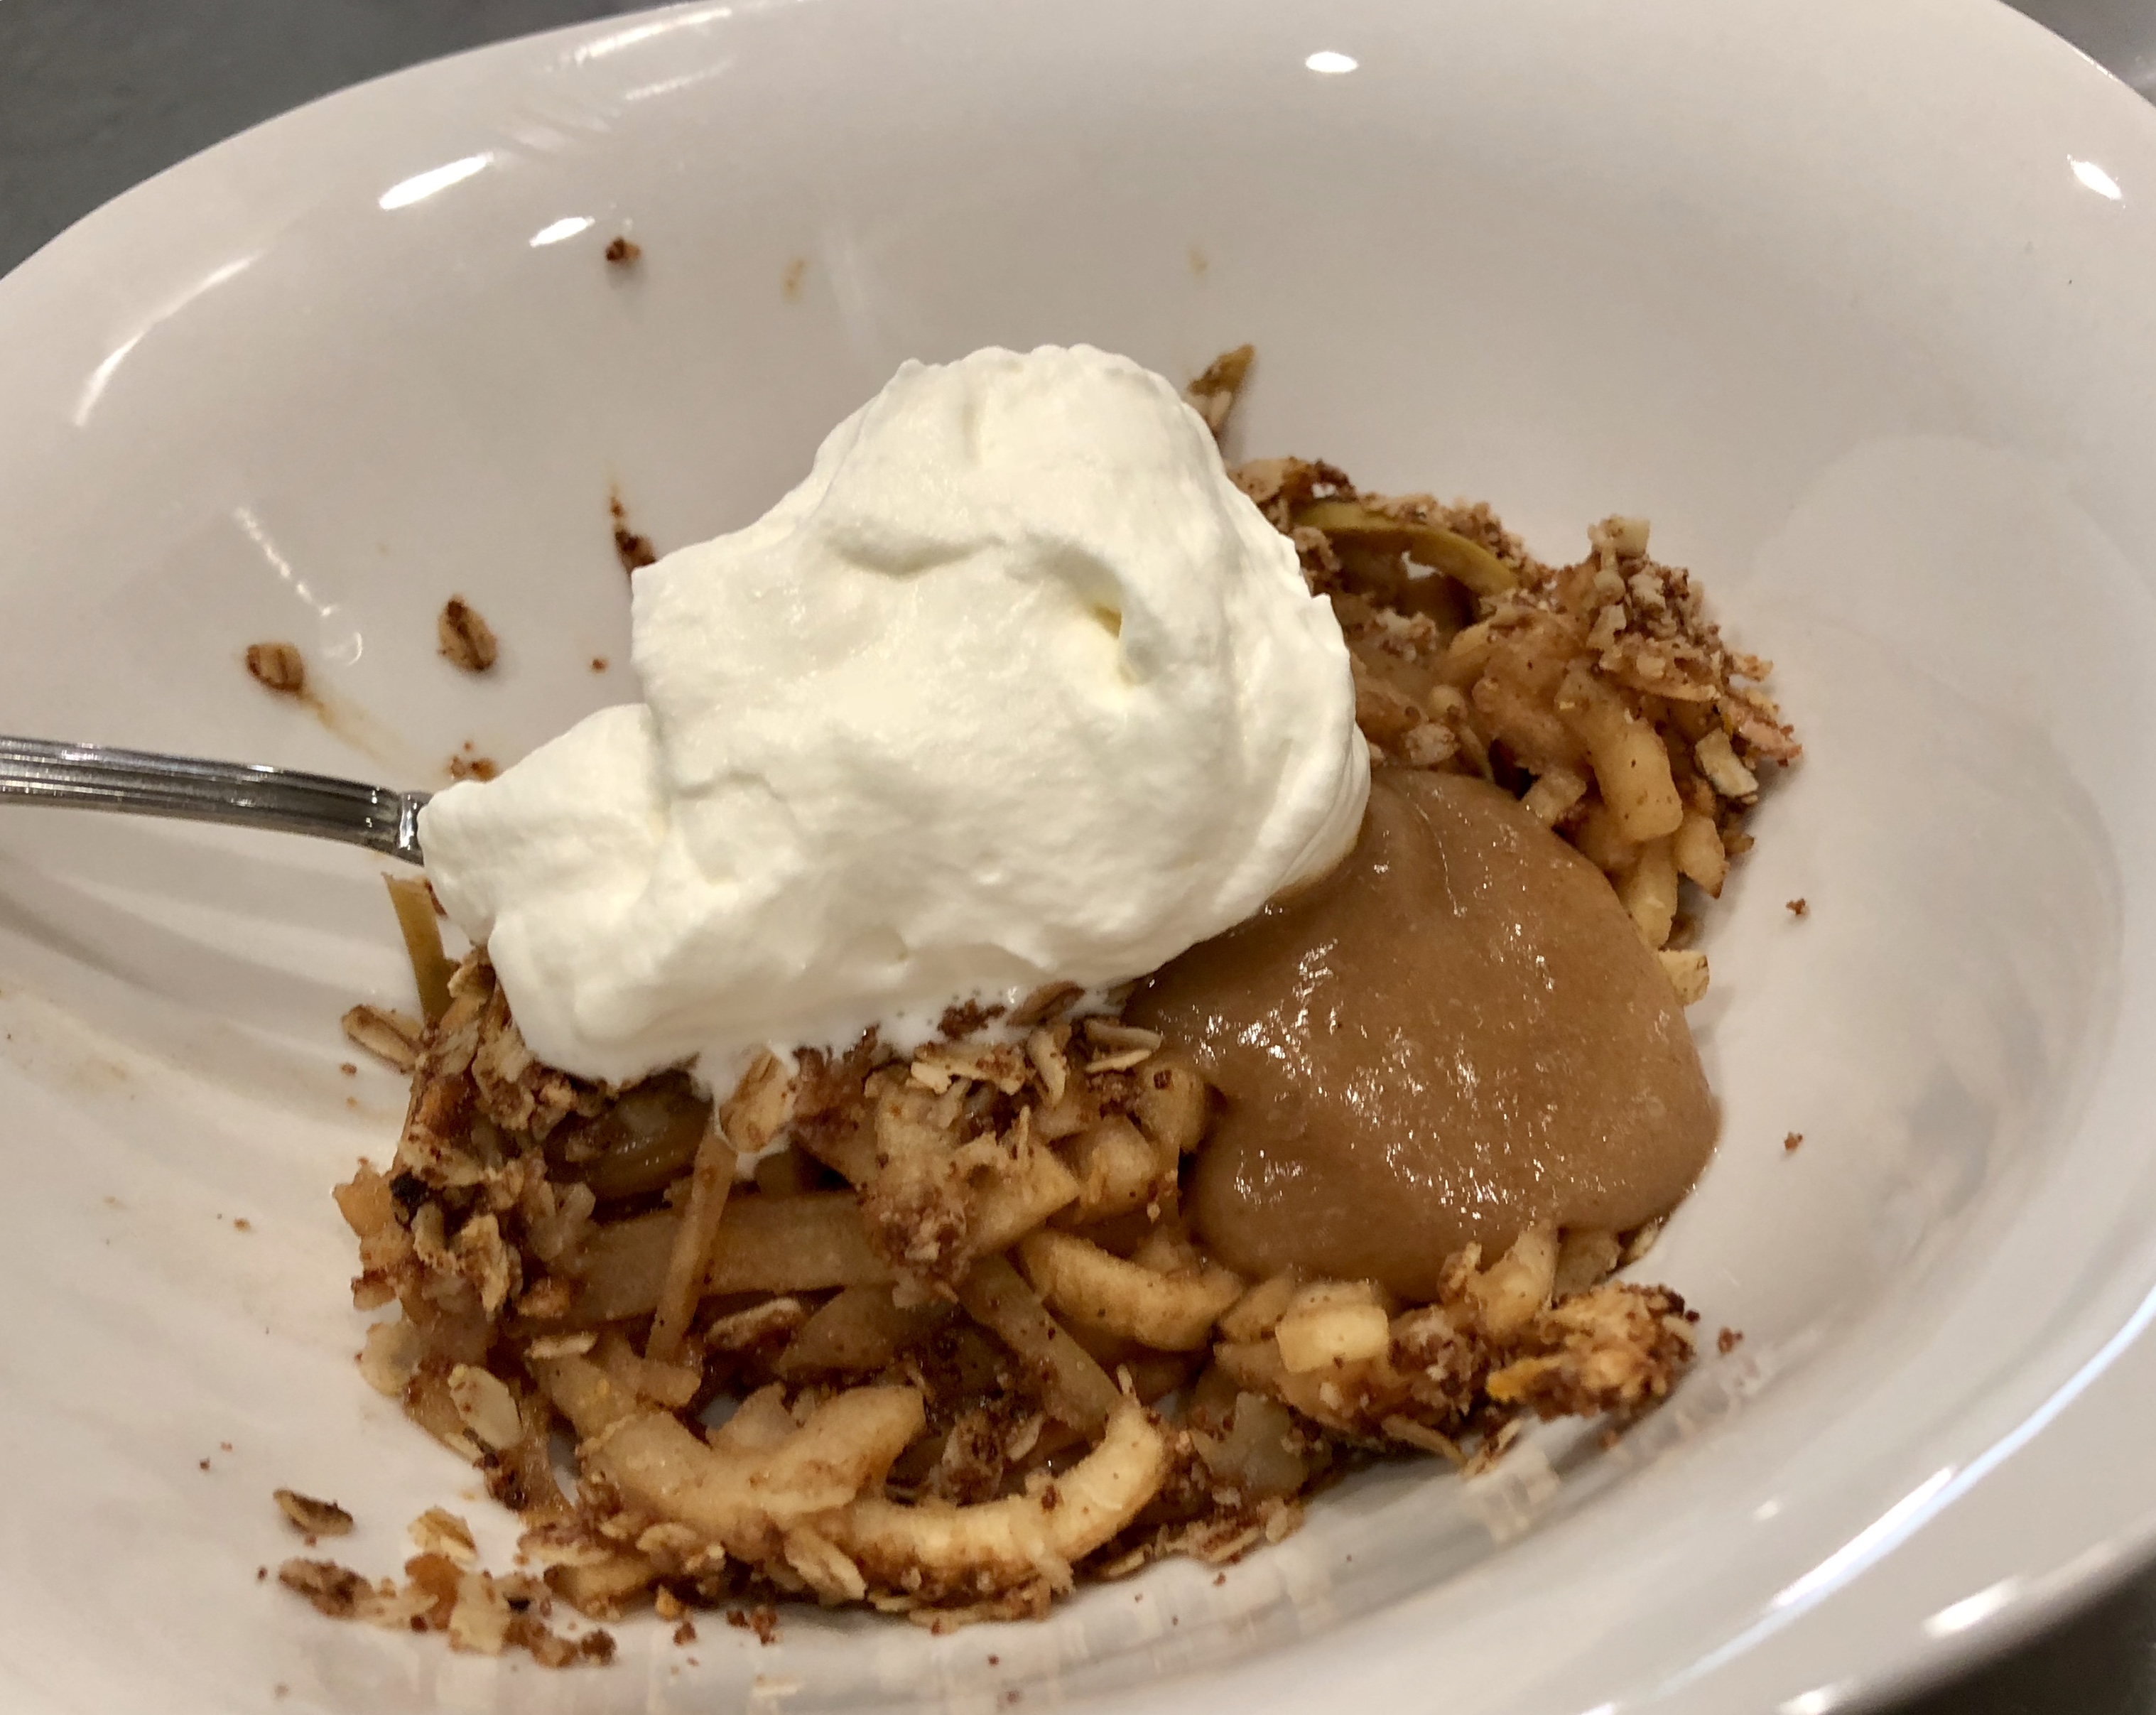
When it’s all put together,  bake in a preheated oven until apples are tender and bubbly and crisp topping is golden.

Top with my homemade salted vanilla date caramel sauce and whipped cream or coconut cream and enjoy!  Dessert is served, guilt free!!

Taco seasoning

 No need to open a packet of taco seasoning from the store laced with msg and other questionable ingredients!  Mix this up and even double or triple and store in an airtight container infinitely.


When you prepare your taco meat, sauté with an onion or crushed garlic if desired.   Add seasoning once you drain your meat, just before it is finished browning. (side note I use grassfed beef so there is no need for me to drain the fat/water from the pan, so I add my seasoning midway through browning to really incorporate the flavor.)  Splash in up to a half of a cup of water if needed.  Allow to simmer for a few minutes.  Enjoy! 


1 Tablespoon Cumin

1 Tablespoon Onion powder

1 Tablespoon Granulated Garlic

1 Tablespoon Smoked Paprika

1 Tablespoon Chili Powder

2 teaspoons oregano

2 teaspoons thyme

Small pinch of salt

1/2 tsp Pepper (adjust for your tastes)

1 pinch cayenne (optional)


Spiralized Nachos


Bored with traditional nachos?  On a grain free diet or just hoping to enjoy some nachos sans the guilt?  Today is your day!  These spiralized nachos are super fun, easy to make and healthy too!

Who doesn’t like curly fries?  I am guessing not that many of you.  When you spiralize a vegetable it changes it to something a little more fun and interesting.  Yes you can make this with sliced potatoes and/or squash but spiralizing them brings it up a level.  They turn into a haystack instead of just a plate.  Super yum!  You also end up using less as the spiralized veggies take up more space than a pile of sliced potatoes would.  In my opinion that leaves more room in my tummy for the toppings, and there is nothing wrong with that!

First step grab your spiralizer and secure it to the table according to your manufacturer’s directions.  Most just tell you to push down to secure the suction cups, others have a lock handle.  (If you are really patient and have a hand spiralizer just get spiralizing obviously…)

For this recipe I used butternut squash, sweet potatoes and russets but feel free to use whatever root veggies you would like.  Beets would be super gorgeous!

Cut the neck off of the squash seperating it from the more round bottom.  Peel the squash and cut it in half if necessary before securing it to the pusher part of your spiralizer.  Also scrub the potatoes and peel if desired.  Cut flat ends on the potatoes for easy spiralizing.  Using the second setting spiralize the squash, then spiralize your potatoes.  Lastly spiralize the onion.

Cut the vegetables with a scissors if desired to make them not so long. They will be much easier to eat this way.  For me I leave them super long as my kids really enjoy them this way.  (Messy but fun and hey they are eating vegetables I won’t complain.)

Now toss the spiralized pile with olive oil, salt and pepper and a tablespoon of my taco seasoning, recipe here.

Roast in a preheated 400 degree oven for 30 minutes stirring about halfway through for even browning.


Once your beautiful pile of spiralized deliciousness is done, remove them from the oven and pile them on an oven safe platter.  Top with shredded cheese and taco meat and return to oven to broil for about 5 minutes until cheese is bubbly and melted.

Remove from oven and top with salsa, guacamole, jalapeños, cilantro, raw onion, corn, black beans, sour cream…whatever you enjoy on your nachos go for it!  Snap a pic when you make this and share!  I would love to see what everyone else tops theirs with!

However you top them, enjoy!


Crunchy Korean BBQ Chicken Wings Instapot


I know what you are thinking, crispy chicken wings from a pressure cooker? Lady you are nuts! But hey don’t stop reading I promise you will be impressed. My husband was blown away thinking I fried them.
It’s super easy too…and fast too!

If your wings aren’t split, cut them apart. Also now would be a great time to trim off any excess fat that may be hanging off your wings.

Place the metal trivet that came with your pressure cooker (if you don’t have a trivet you can grab yours here) and place it in the pot. Salt and pepper your wings and place them on the trivet in layers.


Add one cup of chicken stock, or just water if you don’t have the stock, but the stock adds some great flavor so it’s worth it! Seal the lid on your Instapot and set to manual cook 9 minutes.

Preheat your oven to broil.

While you wait for the wings to cook prepare the sauce. Heat a small saucepan over medium high heat. Drop the coconut oil in and once melted add the garlic and allow to sauté for a minute or two. Be careful garlic burns super fast. Now add the balance of ingredients and allow to simmer while your wings are becoming amazingly juicy.

Once the pressure cooker is done, do a quick release by flipping the top to vent.

Drop your wings in the sauce tossing to coat.
Place wings on a sheet pan prepared with foil and allow to broil for about 6 minutes. Flip over and broil another 2-3 minutes. Be careful, after the first 6 minutes you may need to lower your rack as the sugars in the sauce can get a bit smokey.

Remove from oven, give them another toss in the sauce and serve with celery sticks and blue cheese if you wish. I had to make a second batch right away as they disappeared pretty quickly after I made them…
Cheers!

Smokey Spice Rubbed Venison Chops with portabella mushrooms and onions

I would be lying if I said I wasn’t excited for this post!  In the area of the country we live in hunting is very prevalent.  If the season works out in our favor we end up with venison in our freezer to enjoy throughout the year.  What does one do with this meat?

People tend to find venison challenging to prepare, I am guessing this is because though it is similar to beef it has a finer texture, a lower fat content and a higher water content.  What do I do with this meat I asked myself many, many years ago.  When I inquired people gave me recipes that seemed to cover the meat flavor.  It was almost as if people were eating it begrudgingly, and force feeding it to their children.  Even the hunting magazines would recommend making beautiful backstraps into chicken fried steak with butter cracker crumbs.  If that is how you enjoy it, I am happy for you.  If you want to try something new, keep on reading, I promise it will get awesome…

Today we are preparing chops.  Venison chops are cut from the rib area of the deer, this tender meat runs along the spine. Sidenote… In the event you don’t enjoy or have any venison feel free too substitute lamb or grassfed beef either rib or shoulder chops for the venison.

Alright, lets do this!  My chops were beautifully butterflied and ready for me to work with, so I grabbed my trusty spice blend (see recipe below), it contains smoky, sweet, earthy and savory elements, think smoked paprika, cumin, thyme, coconut sugar (or brown if you prefer), thyme…and seasoned them on both sides.  Crushed a couple of garlic cloves, sliced a sweet yellow onion, and sliced up a portobella mushroom I had hanging around.

Next step heat that pan up.  I grabbed a sauté pan, in retrospect a cast iron pan probably would have brought it up even another level.  Heat your pan over medium high heat.  When your pan is hot, drizzle in about a tablespoon of extra virgin olive oil, add your chops and sear for 3-4 minutes.  Don’t touch the chops once you put them in the pan until the 3-4 minutes is up.  This is super important as if you begin to shift them around, they may stick and you will ruin the beautiful crust you are trying to achieve.

Once they are nice and browned on the first side, give them a quick flip to sear the other side.  Once you flip them add the onions, garlic and mushroom to pan around the chops and continue to cook for an additional 3-4 minutes again not moving the meat.  You will have to move the garlic, onion, mushroom mix around a bit to keep it from burning.  After you sear the second side, flip your chops once more time, that makes 2 flips, add the wine to the pan and allow to reduce by half as your chops finish cooking, approximately 2 minutes.  Remove the chops from the pan place on a warm serving platter, pour everything from pan on top scraping any browned bits off.  Don’t leave all that extra yumminess behind!

Allow to rest for about 5 minutes under foil.  Your chops should be medium following this time guideline.  If you prefer them more rare, or more well done make adjustments accordingly (+ or -1 minute at a time until desired temperature is reached).

No joke, my kids inhaled this as did my husband.  No nagging was involved, no bribery, no convincing.  Just straight up silence as they chewed.  Silence is golden as we all know especially when your house is a zoo, like mine.  Don’t get me wrong, I love my kids and know these are the glory days, and someday, sooner than I realize my house will be quiet again.  Yet sometimes just a nice peaceful dinner is nice.  In the spirit of a traditional midwest family dinner, my plate has mixed veggies and some lovely roasted squash.  I seasoned my squash the same as the venison with my smokey spice blend and roasted it until it was golden.  As for the fancy (okay they weren’t) veggies, just a quick steam and a grind of sea salt and black pepper, topped with a little butter.  Cheers!

I hope you enjoy your venison more after this post!  Feel free to reach out to me if you want more tips or tricks.  If you make this add a picture or comment to the post, I always love to hear from you!


Jamaican Jerk Chicken

Many of my friends have been subject to my Grilled Jamaican Jerk Chicken recipe.  Some have cried over a bowl of it they loved it so much, as the sweat poured off their faces… (you know who you are.) Others have begged for the recipe and added it to their regular meal rotation.

Challenged with teaching a class on batch cooking, I have taken it a step farther.  In the past I have marinated my chicken in this tangy, sweet and spicy sauce, then grilled them, but for my class I used the sauce as a way to bring back life to some leftover chicken thighs and roasted vegetables.

I prefer to double the marinade recipe so I have extra sauce and marinate bone-in chicken thighs or legs for at least an hour, overnight is better.  Then grill them using the indirect cooking method for 45 minutes.

Still awesome is this Jerk sauce with roasted vegetables over rice, prepared with coconut milk instead of water.

You can also use this sauce on fish, pork or turkey.  Your day after Thanksgiving turkey sandwich will be amazing if you mix a spoonful of this sauce with some mayo and spread it on your sandwich, or drizzle it over whatever leftovers you have.  Make a delicious Jerk Chicken pizza, pasta, quesadillas …the options are endless.

To prepare for use as a sauce over cooked chicken and vegetables heat pan over medium heat.  Swirl in olive oil and begin to cook the diced onions.  Sauté onions for about 5 minutes until they begin to become translucent.  Add garlic and other spices and continue to sauté for an additional 2 minutes.  Add balance of ingredients and allow to simmer for about 10 minutes to allow all the flavors to marry.  Toss with your chicken and vegetables and serve over rice.

To use as a marinade, add all ingredients to a large zip top bag.  Mix well.  Add chicken and allow to marinate for at least an hour, preferably overnight.  Remove meat from marinade and fully cook on the grill or in the oven.  While chicken cooks, bring marinade to a boil, then allow to simmer for about 10 minutes.  Top chicken with extra sauce and/or serve on the side.

Either way you choose to go with it, enjoy!


This recipe was originally adapted from a post from literally over 10 years ago I found here

http://classic-recipes.com/page/poultry/jerkchk.htm

Use organic non-gmo ingredients whenever possible.

Pressure Cooker Butternut Squash Risotto

Recipe remix time!  Move over Pumpkin Spice Latte!  I know we all love risotto and I also understand the time commitment involved in making a great pan of it.  Three kids and a crazy schedule does not equal risotto.  So today I decided to remake my Pumpkin Risotto with Browned Butter Sage Leaves but this time using my trusty Instapot.

I changed up a couple of ingredients since the amount of liquid used is significantly less, and the cook time is slashed as well.  Butternut Squash has less water than pumpkin and is more readily available right now making it an awesome choice for this delicious fall inspired risotto.

By taking the extra step to roast the Butternut Squash you are coaxing all the sweet natural sugars out of the squash really making it shine!  You could just brown it in the instapot, but you won’t achieve the same result.  It will still be awesome, but it could be even more awesome if you can roast it.

To start peel and dice the squash.  Toss it with extra virgin olive oil and salt and pepper.  Roast in a 450 degree oven for about 30-45 minutes or until it is soft and golden.  While this is roasting get to work on your risotto and browned butter sage leaves.

If you have never had browned butter Sage leaves you are in for a treat!  Grab your butter stick and melt in a pan over medium heat.  Keep an eye on it after it melts and let it continue cooking until the fat separates and you see a nice brown color.  Don’t go to far or you will have burnt butter.  Just a nice deep golden brown.  Now drop in your Sage leaves and allow to cook for 2-3 minutes.  They are done when you begin to see spots on them.  Allow to cool on paper towels and set aside.  These will finish off your dish with a little sophistication at the very end.

Brown butter fried sage leaves

Saute your diced vegetables, garlic and herbs on sauté setting in about a tablespoon of oil.  Remove veggies and add the the measuring cup.

Next sauté the sausage in a little more oil until cooked through.  Add rice and continue to cook for about 2-3 minutes. The rice will turn clear then almost white again.  Add wine and allow to simmer down until most of the liquid is gone, this should take only a couple of minutes.

Now add the chicken stock to the measuring cup with the vegetables (except the squash) and make sure you have exactly 4 cups in there.  No more no less.  This is super important.  Add to the pot and seal lid.  Make sure the lid is set to pressure.

Press manual and adjust to 7 minutes.  When your machine is finished (about 20 minutes between coming to pressure and the actual cook time) shut it off right away and do a Quick Release.  Once all the steam is released carefully open the lid and remove the pot.  Stir in approximately 4 cups of the roasted squash, and your shredded cheese (cheese is optional but delicious).

To serve top each dish with a few fried Sage leaves and enjoy with a crisp salad and a great glass of wine.

Enjoy!  Blessings

Albondigas–Spanish Meatballs (kefta style)

We love visiting my family in Marbella, Spain.  Not only do we get to spend a lot of time catching up with my favorite Uncle and family, we also enjoy plenty of sun, sand and amazing food.  Generally I am all about the fresh fish and eat as much of it as I can while I am so close to the Mediterranean.  I also love the Kefta served at Gurrola, a little cantina in Marbella where my Uncle and his buddies can be found most days around noon.  The Kefta at Gurrola is a version of the delicious albondigas or Spanish meatball, cooked in a delicious tomato sauce containing several Moroccan style spices, think cumin, cinnamon, etc.  Clearly not fresh fish related at all, but so amazing!

Now I am not going to claim these are exactly the same as the deliciously spicy albondigas at Gurrola, nor can I somehow cook up the atmosphere you would enjoy there, but these are as close as my tastebud memories can take me.  And when I take a bite of one of these delicious spicy meatballs and close my eyes I can almost smell the Mediterranean Sea and hear my Uncle chatting it up with his buddies.

These come together rather fast and can absolutely be made up a day or two ahead of time and stored in the refrigerator, or frozen for a couple of months, properly stored.

To make these meatballs I have used grassfed ground beef and/or venison or lamb.  The slightly earthier flavor of the grassfed beef (or venison or lamb) add to the authentic flavor of the meatballs, not to mention grassfed beef has so many great health benefits compared to commercial beef.

Step one prepare your sauce so it has time to simmer while you assemble your meatballs. Begin by heating a pan over medium high heat.  When your pan is hot drizzle in a tablespoon or two of extra virgin olive oil (Spanish if you have it).  Sauté onion in oil for 5-7 minutes until softened and fragrant.  Add garlic and continue to cook for another minute.  Now season your onion and garlic with the paprika, cumin, salt, and pepper.  Stirring rather constantly cook for an additional couple of minutes giving the spices time to develop.  Lastly add tomatoes to pan along with cayenne, cilantro, parsley and bay leaf.  Allow to simmer while you prepare your meatballs.  If you made your meatballs in advance, allow sauce to simmer for about 15-20 minutes before adding them to the sauce to cook.

For the meatballs, mix all meatball ingredients together with the exception of the water, using your hands.  Take care not to overwork the meatballs as this can make them tough.  Once the ingredients are well incorporated, roll them into balls about the size of half a golf ball.  Place all the meatballs along with the water into the pan and cover.  Lower heat to a simmer and allow to simmer for about 45 minutes.

Top with additional fresh cilantro and parsley.  Serve warm with lots of crusty bread for sopping up all of that delicious sauce.


Cheers!


Roasted Rack of Lamb with rosemary and garlic

Roasted Rack of Lamb with Rosemary and Garlic

Half way through March already!  Please send Spring!  I wish I could have grilled this but the weather was so not cooperating…so oven roasted rack of lamb it is.

We were lucky enough to enjoy a trip to Ireland several years ago for business.  We decided to take advantage of the fact that we were there and stayed some extra time to really appreciate the sights and people of Ireland.  As for the food, yummy!  In the beautiful coastal town of Kinsale we enjoyed some amazing sea food, but the balance of the trip I seemed to be eating more than my share of roasted lamb shank with root veggies and brown bread.  Yes, lamb. It was so delicious I just couldn’t stop!  Back in the US the only lamb I can really appreciate is Australian lamb or sometimes lamb raised by responsible local farmers who allow them to graze freely on grass, etc.

As much as I enjoyed their beautiful lamb shanks my family prefers rack of lamb, so when we are lucky enough to enjoy a nice lamb dinner I usually grab racks. Lucky for me Costco has a decent price on Australian racks and they are super delicious!

Lamb may sound like a kitchen challenge, but I will say fear not!  It is a very easy meat to prepare as there is plenty of fat, so if you accidentally cook it a few minutes too long it isn’t a huge deal.  I much prefer to use my grill for lamb, but let’s face it sometimes that just doesn’t work out.  So today, we are going for a beautiful oven roasted rack.

Step one, prepare your meat by rubbing it with olive oil, rosemary, crushed garlic, course salt and fresh ground pepper.  Let it rest for about an hour on the counter, taking the chill off of it so it can be properly seared.

Heat a large roasting pan on high.  Drizzle in a bit of olive oil and swirl it around to coat the pan.  To avoid smoking too much I pull the pan off the heat for a moment when I add the oil.  Returning the hot oiled pan to the stove place your lamb meat/fat side down and sear for about 4 mins per side, or until you have a nice sear on each side.  Carefully (the bones will be hot) stand the racks up, meat on the bottom, rib bones on up, interlocking the ribs with other rack.  Roast in 400 degree oven or an additional 10-15 minutes or until meat reaches desired doneness, remove from oven.

Let rest 5-7 minutes.  It looks pretty amazing to set this on a pretty serving platter, but feel free to take it up a notch cutting the ribs apart by slicing in between bones to make a bone in chop and dipping it in some black and white sea salt.  Serve with some sautéed green beans and roasted garlic potatoes and you have yourself a gourmet meal, with your active cooking time around 30 minutes.  Enjoy, Cheers!

Roasted Rack of Lamb with Rosemary and Garlic Pan seared and roasted lamb rubbed with crushed garlic and rosemary make a simple elegant meal with less than an hour of active time. Sit back relax and enjoy with a great glass of wine. Cheers!

Best Chili Ever–Instapot or slow cooker!

Everyone has their favorite chili recipe so best chili ever may be a bit bold…but that is what my husband said when he tried this chili so I am going with it!  I made mine in an Instapot but you can definitely make this on the stove or in a slow cooker.

I like making a huge batch when I make chili as it makes a great lunch the next day, or a super yummy dinner with little effort the following night.  Ideas for this super yummy dinner could include chili cheese fries, chili stuffed baked potatoes, chili quesadilla or burrito, chili cheese mac, chili pizza the list goes on and on…tell us your favorite!

I started my chili with dried beans instead of canned, feel free to sub 2 cans of beans if you wish.  To cook the beans I put one cup of dry beans in the Instapot with 3 cups of water.  Using the manual setting with the valve set to pressure I pressure cooked them for 25 minutes, then manually released the pressure.  Set beans and cooking liquid aside.  If you need directions on how to cook the beans without an Instapot, directions can be found here.  Turn off cooker and turn it back on to sauté.  Once the pot is hot, drizzle in a couple tablespoons of olive oil then brown your ground beef and sauté the onions in the pot together.  Since I use grassfed beef I generally don’t need to drain the fat off, if you need to, please do so once the meat has browned.  Now toss in the garlic and sweet potatoes along with herbs and spices.  Let these guys cook together for a minute or two, then simply dump the rest of the ingredients into the pot, including the beans and bean water.  Reseal Instapot and using manual setting cook  for 15 minutes.  Let natural release and hold until ready to serve or go ahead and release the pressure manually after a couple of minutes if you have a hungry crew who can’t wait.  Be sure to check for seasoning before serving, as the tomatoes, and possibly your beans contain salt, seasoning at the end will give you more control of your finished dish.

Alternately, for slow cooker preparation, do all the browning/sautéing on your stovetop, then mix everything into the your slow cooker and set on low heat for up to 8 hours.

Top with shredded cheese, raw onion, avocado, tortilla chips, cilantro…whatever you please, and enjoy!  Cheers!


  • « Previous Page
  • 1
  • 2
  • 3
  • 4
  • Next Page »

Meet the Author

MaryJo is a busy mom with 3 beautiful children. She enjoys paddle boarding, kayaking. and cross country skiing. She loves food...cooking it, eating it and especially sharing it with everyone.

Connect With Me

  • Facebook

Copyright © 2025 · Foodie Pro Theme by Shay Bocks · Built on the Genesis Framework · Powered by WordPress