Just Another Mom HQ

Just another Mom's guide to a healthy lifestyle

  • Home
  • Recipes
  • Essential Oils
    • Visit My Oils Page
  • All Natural Products
  • Sydi’s Blog

Albondigas–Spanish Meatballs (kefta style)

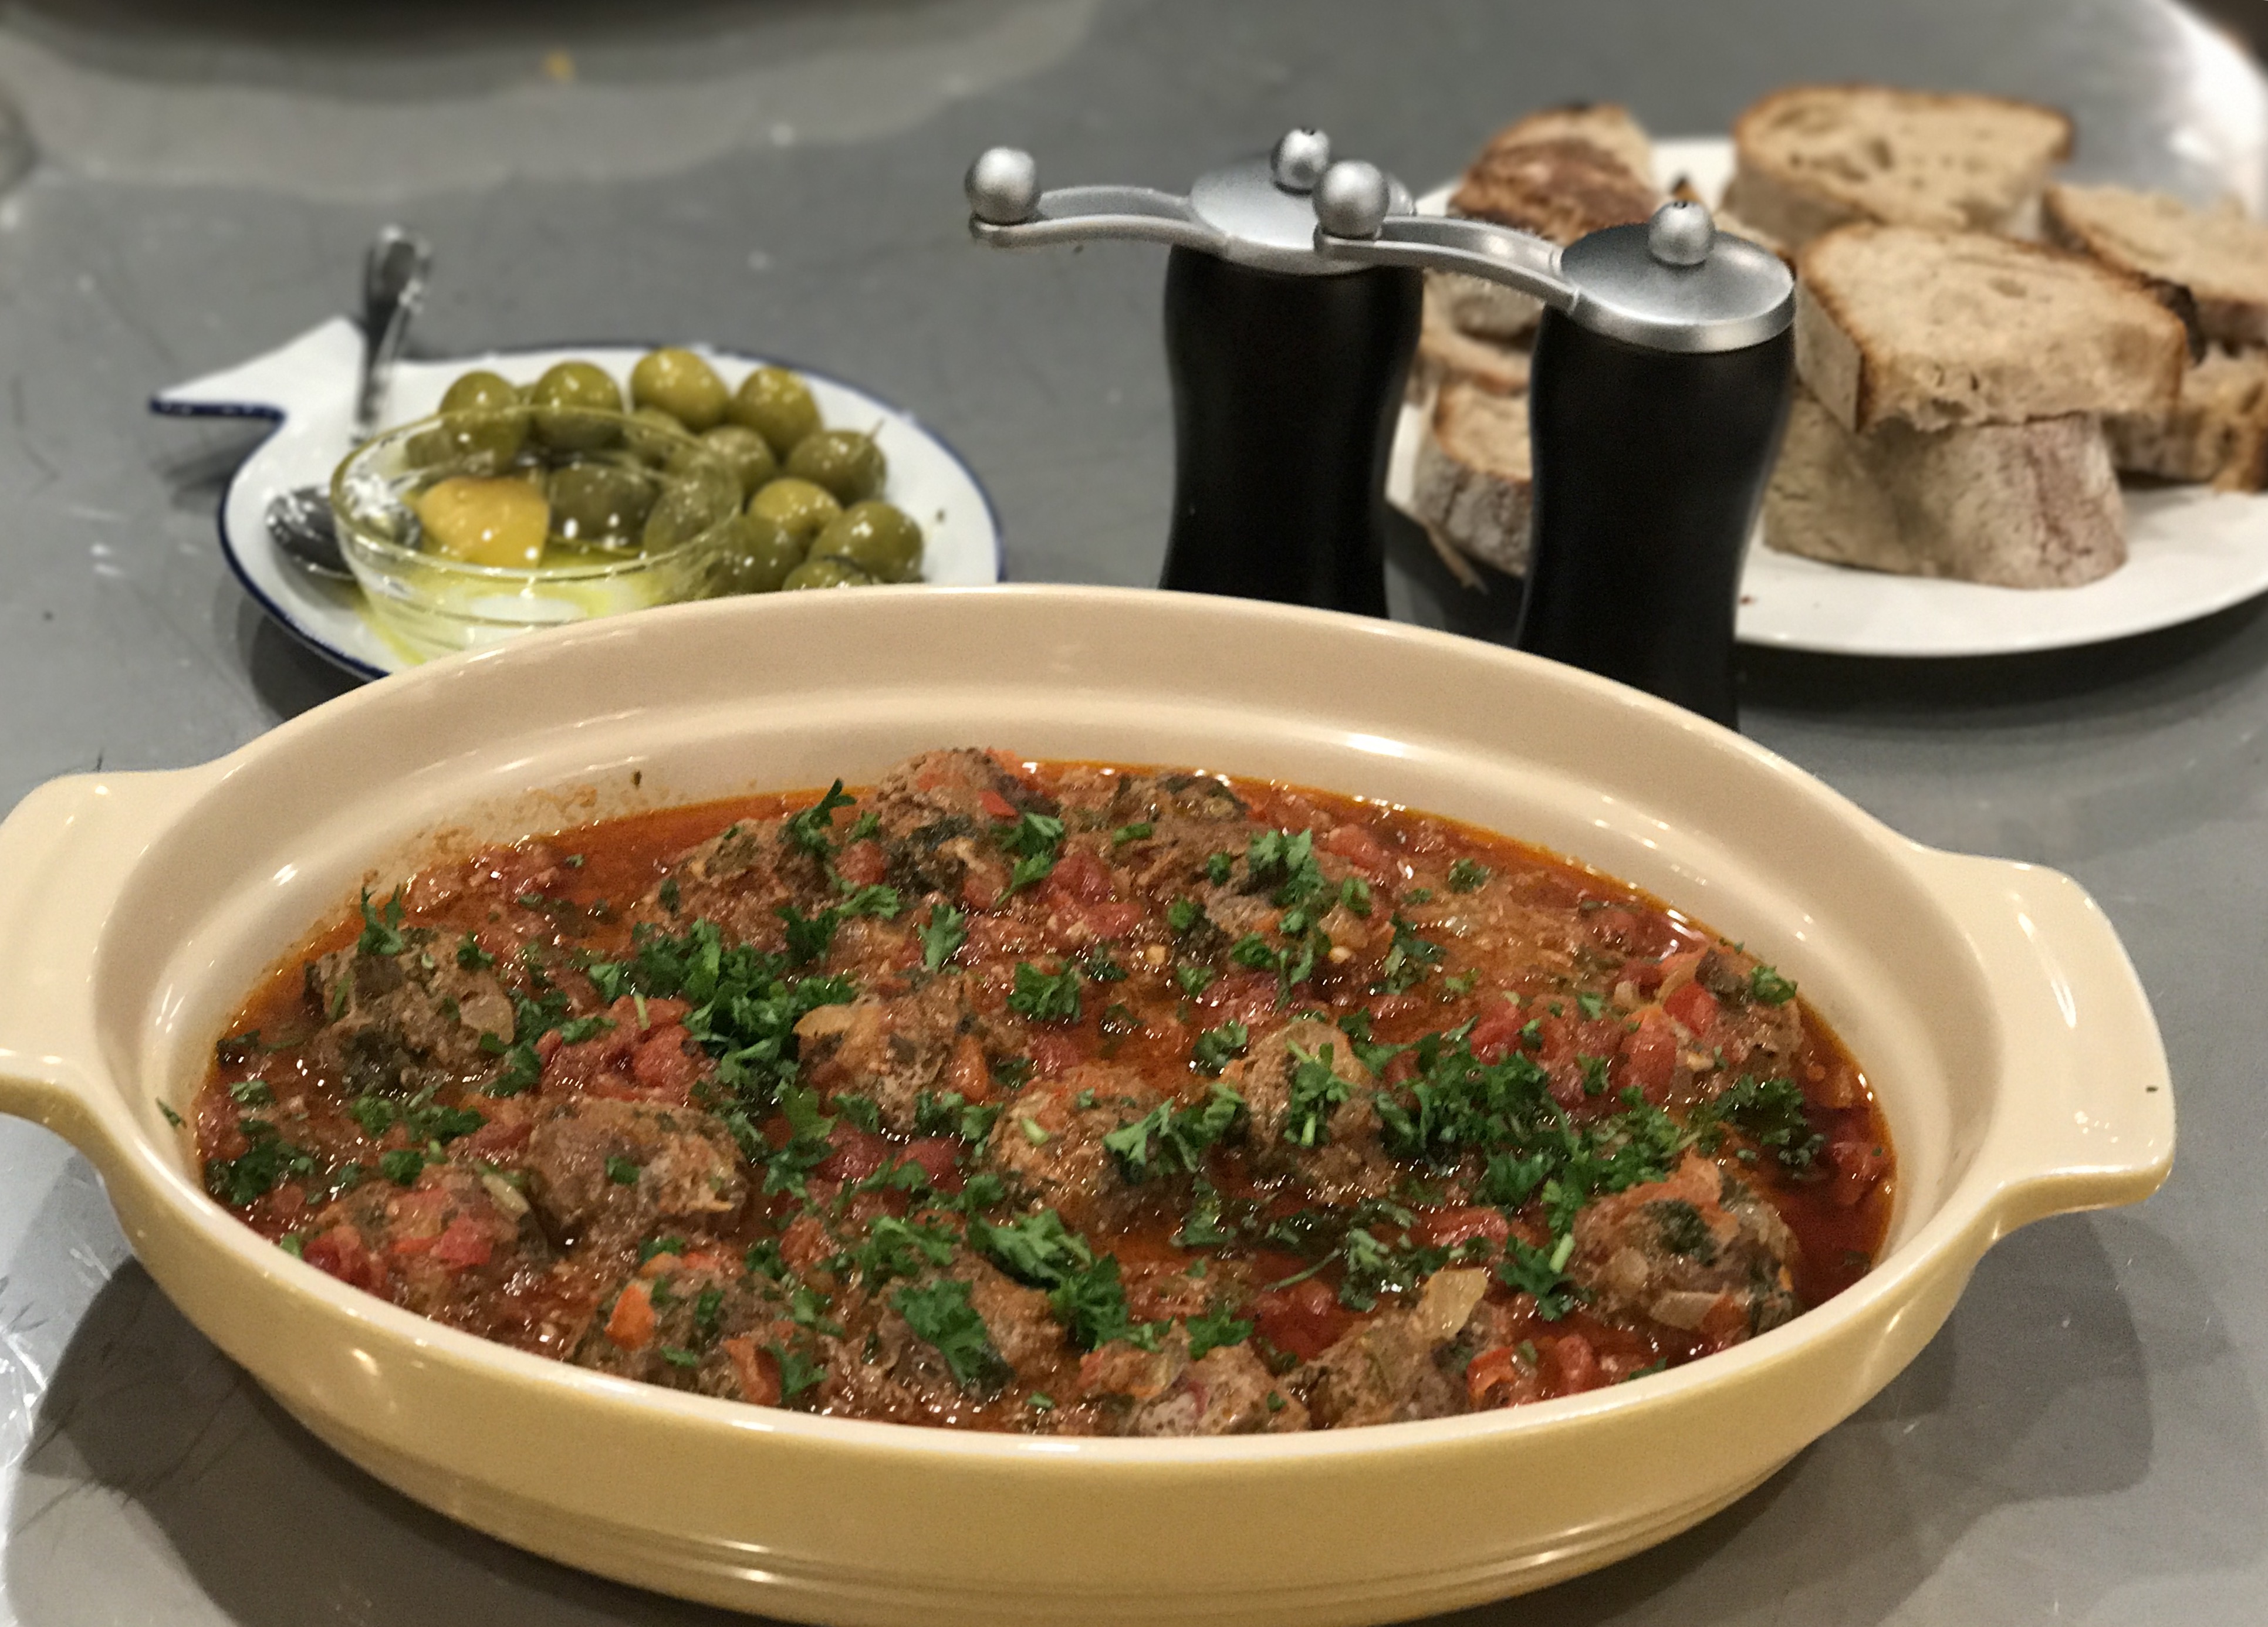
We love visiting my family in Marbella, Spain.  Not only do we get to spend a lot of time catching up with my favorite Uncle and family, we also enjoy plenty of sun, sand and amazing food.  Generally I am all about the fresh fish and eat as much of it as I can while I am so close to the Mediterranean.  I also love the Kefta served at Gurrola, a little cantina in Marbella where my Uncle and his buddies can be found most days around noon.  The Kefta at Gurrola is a version of the delicious albondigas or Spanish meatball, cooked in a delicious tomato sauce containing several Moroccan style spices, think cumin, cinnamon, etc.  Clearly not fresh fish related at all, but so amazing!

Now I am not going to claim these are exactly the same as the deliciously spicy albondigas at Gurrola, nor can I somehow cook up the atmosphere you would enjoy there, but these are as close as my tastebud memories can take me.  And when I take a bite of one of these delicious spicy meatballs and close my eyes I can almost smell the Mediterranean Sea and hear my Uncle chatting it up with his buddies.

These come together rather fast and can absolutely be made up a day or two ahead of time and stored in the refrigerator, or frozen for a couple of months, properly stored.

To make these meatballs I have used grassfed ground beef and/or venison or lamb.  The slightly earthier flavor of the grassfed beef (or venison or lamb) add to the authentic flavor of the meatballs, not to mention grassfed beef has so many great health benefits compared to commercial beef.

Step one prepare your sauce so it has time to simmer while you assemble your meatballs. Begin by heating a pan over medium high heat.  When your pan is hot drizzle in a tablespoon or two of extra virgin olive oil (Spanish if you have it).  Sauté onion in oil for 5-7 minutes until softened and fragrant.  Add garlic and continue to cook for another minute.  Now season your onion and garlic with the paprika, cumin, salt, and pepper.  Stirring rather constantly cook for an additional couple of minutes giving the spices time to develop.  Lastly add tomatoes to pan along with cayenne, cilantro, parsley and bay leaf.  Allow to simmer while you prepare your meatballs.  If you made your meatballs in advance, allow sauce to simmer for about 15-20 minutes before adding them to the sauce to cook.

For the meatballs, mix all meatball ingredients together with the exception of the water, using your hands.  Take care not to overwork the meatballs as this can make them tough.  Once the ingredients are well incorporated, roll them into balls about the size of half a golf ball.  Place all the meatballs along with the water into the pan and cover.  Lower heat to a simmer and allow to simmer for about 45 minutes.

Top with additional fresh cilantro and parsley.  Serve warm with lots of crusty bread for sopping up all of that delicious sauce.


Cheers!


Best Chili Ever–Instapot or slow cooker!

Everyone has their favorite chili recipe so best chili ever may be a bit bold…but that is what my husband said when he tried this chili so I am going with it!  I made mine in an Instapot but you can definitely make this on the stove or in a slow cooker.

I like making a huge batch when I make chili as it makes a great lunch the next day, or a super yummy dinner with little effort the following night.  Ideas for this super yummy dinner could include chili cheese fries, chili stuffed baked potatoes, chili quesadilla or burrito, chili cheese mac, chili pizza the list goes on and on…tell us your favorite!

I started my chili with dried beans instead of canned, feel free to sub 2 cans of beans if you wish.  To cook the beans I put one cup of dry beans in the Instapot with 3 cups of water.  Using the manual setting with the valve set to pressure I pressure cooked them for 25 minutes, then manually released the pressure.  Set beans and cooking liquid aside.  If you need directions on how to cook the beans without an Instapot, directions can be found here.  Turn off cooker and turn it back on to sauté.  Once the pot is hot, drizzle in a couple tablespoons of olive oil then brown your ground beef and sauté the onions in the pot together.  Since I use grassfed beef I generally don’t need to drain the fat off, if you need to, please do so once the meat has browned.  Now toss in the garlic and sweet potatoes along with herbs and spices.  Let these guys cook together for a minute or two, then simply dump the rest of the ingredients into the pot, including the beans and bean water.  Reseal Instapot and using manual setting cook  for 15 minutes.  Let natural release and hold until ready to serve or go ahead and release the pressure manually after a couple of minutes if you have a hungry crew who can’t wait.  Be sure to check for seasoning before serving, as the tomatoes, and possibly your beans contain salt, seasoning at the end will give you more control of your finished dish.

Alternately, for slow cooker preparation, do all the browning/sautéing on your stovetop, then mix everything into the your slow cooker and set on low heat for up to 8 hours.

Top with shredded cheese, raw onion, avocado, tortilla chips, cilantro…whatever you please, and enjoy!  Cheers!


Slow Simmered Italian Beef Ragu with Parpadelle

Today I posted my grain free and Instapot version of this Italian classic but wanted to share with you the original recipe we simmered slowly on Christmas Day.  It was AMAZING!  So grab a 2 1/2 lb chuckroast (preferably grass fed), a pound of parpadelle and let’s do this!

Grab your large Dutch oven or stock pot.  Heat over medium high to high heat.  Cut your roast into 4 equal sized chunks and season with salt and pepper.  Drizzle in a couple tablespoons of olive oil.  Sear meat 2 pieces at a time browning on all sides.  Set meat aside and add “sofrito”; diced carrot, celery and onion.  Sauté in the same pan as you seared your meat scraping the bits as you go.  After 3 minutes add in the crushed garlic, herbs and tomato paste. Continue to cook and stir until your tomato paste darkens slightly.  Don’t stop stirring or your tomato paste may burn!

You can just throw everything in the pot and skip browning the meat and sautéing the veggies if you don’t have time, and it will still be awesome , but taking the time for this step adds some really great flavor and depth to your dish and makes it more awesome.

Now deglaze the pan (you do this with the veggies in the pan) with your red wine.  Choose one that you would enjoy drinking. Please don’t use “cooking wine”…Malbec, Cabernet, even a good Chianti would be great.  Carefully add the wine and allow it to simmer a minute or two to evaporate some of the wine.

Everyone in the pool now (except cheese and pasta).  Meat, stock, tomatoes…  Bring to a low simmer and cover.  Keep at a low simmer for 2.5 hours, then remove cover and simmer an additional 30 minutes to reduce and thicken the sauce.  Remove meat, shred then add back to pan.

While your sauce is reducing bring a pan of water to boiling, add pasta and a generous pinch of salt. Cook pasta 2-3 minutes shorter than package directions.  Drain pasta reserving one cup of the cooking liquid.

Add pasta and water to sauce and cook for 2-3 more minutes allowing pasta to finish cooking in the sauce.  Check seasoning and adjust salt and pepper if needed.

Grab your favorite pasta bowl/plate, pile on the pasta and top with some freshly grated Parmesan or pecorino.  Sit back relax and savor the deliciousness…cheers!

Slow Simmered Italian Beef Ragu with Parpadelle, my take on a classic Italian comfort food.


Side Notes-On my quest to make the perfect Beef Ragu I found this beautifully yummy recipe from Pinch of Yum

Crockpot Braised Beef Ragu with Polenta

And this delicious sounding recipe from Whitney Bond

http://whitneybond.com/2014/10/27/slow-cooked-beef-ragu/

Instapot Italian Beef Ragu with Butternut Squash Noodles (squoodles)

Italian Beef Ragu with Butternut Squash Noodles

Happy New Year!!  I am always sad to take down our Christmas tree and decor.  At the same time I prefer my stand up paddle board to my cross country skis so being one step closer to Spring isn’t so bad either!  This year I am hoping to share more recipes and insight with you, including Instapot recipes!  This recipe can definitely be made stove top as is traditional, in a slow cooker or in your Instapot or other pressure cooker.

Traditionally this delicious slow simmered Ragu would be prepared stove top, simmered over several hours.  For Christmas Day I prepared this recipe with a slight variation stovetop (recipe here) and we enjoyed every delicious bite on some chewy delicious parpadelle pasta.  Yes actual gluten loaded pasta…and it was divine.

[amazon text=Amazon&asin=Today in keeping with my more paleo-ish lifestyle I have prepared it with spiralized Butternut Squash.  The earthy sweetness of the squash paired super well with the deep beefy tomato yummyness.  I also grabbed my Instapot for this one as I was rather short on time and it didn’t disappoint!  I chose to leave out the tomato paste that I had used on Christmas in my more traditionally prepared Ragu as sometimes the tomato paste can burn to the bottom of your Instapot.

For the preparation, turn your Instapot on sauté.  Cut your roast into 4 equal size chunks, season with salt and pepper.  Once your Instapot is hot sear 1 or 2 pieces at a time browning on all sides (2-3 minutes a side).  Then set aside.  Next sauté the “sofrito”, carrot, celery and onion in a bit of olive oil and a pinch of salt and a pinch of black pepper for about 5 minutes to really develop the flavor.  Add garlic, oregano and thyme and continue to sauté for an additional minute or until fragrant.

Deglaze the pan by pouring in 3/4 cup of a good dry red wine, I had a Spanish Tempranillo open so I chose that for my sauce.  Let it simmer for a minute or two or until the liquid reduces just a little.

Pan full of Butternut Squash Noodles

Now add the beef, beef stock, and tomatoes to the veggies and wine. I usually wait until the end to salt as there is salt in the tomatoes and the stock and as it reduces it will concentrate the salt flavor.  Lock cover on Instapot and press manual then adjust to 20 minutes on high pressure.  While your Ragu is cooking grab your spiralized and spiralize your Butternut Squash.  Any pieces that couldn’t be spiralized save for squash fries or squash hash or whatever your desired preparation.  Toss your squash with a tablespoon of olive oil and a touch of salt and pepper and roast in a 400 degree oven for 20 minutes.  You should have plenty of time for this step as it takes a while for your pressure cooker to come to full pressure (up to 15 minutes).

After the 20 minute pressure cook is complete allow to natural release for a minute or so then flip the valve to manual release.  I use my Instapot on my stovetop with a cutting board under it, so I can use my fan to vent steam, etc.  I really don’t want to damage my cupboards while releasing steam or smoke the house up searing meat!  Okay once your steam is all released and you can safely open your pressure cooker turn it off, then back on the sauté high.  Remove meat and shred while the sauce is reduced until it thickens.  Then toss Squash Noodles  (squoodles) into the sauce and let it cook for a minute or two longer.  Season to taste with salt and pepper, pile it on your favorite pasta plate, hit it with a grating of Parmesan or Pecorino and enjoy.

Cheers!

Italian Beef Ragu with Butternut Squash Noodles

PS:  Don’t let the wine you opened go to waste.  If you don’t enjoy drinking it be sure to freeze it in ice cube trays for future recipes.

PPS:  There was an error in the original recipe, I have since reduced the beef broth on the recipe from two cups to one.  Sorry for any inconvenience this caused!

Meet the Author

MaryJo is a busy mom with 3 beautiful children. She enjoys paddle boarding, kayaking. and cross country skiing. She loves food...cooking it, eating it and especially sharing it with everyone.

Connect With Me

  • Facebook

Copyright © 2025 · Foodie Pro Theme by Shay Bocks · Built on the Genesis Framework · Powered by WordPress