Just Another Mom HQ

Just another Mom's guide to a healthy lifestyle

  • Home
  • Recipes
  • Essential Oils
    • Visit My Oils Page
  • All Natural Products
  • Sydi’s Blog

Italian Steakhouse Wine and Herb Marinated Grass Fed Steak with Onions and Mushrooms

Italian steakhouses are all over the US.  The food is delicious, the atmosphere varies from white table cloth to the little Mom and Pops that are cozy, friendly and just down to earth.  As I was preparing to teach an Italian Steakhouse cooking class I decided to do a little more extensive research than just throw together another “insert Steakhouse house name here” knockoff.

From my research there is a steak in Italy called bistecca alla fiorentina, or literally steak florentine.  It is a large porterhouse to be accurate the exact beef is Chianina beef from the Chiana Valley, cut 2 1/2 to 3 inches thick.  It is dry aged then prepared simply with salt and olive oil, then seared over a very hot wood fire to rare.

A little background on me…I completely gave up eating commercial beef 20 years ago.  Let’s just say whenever I ate some I ended up feeling pretty yucky.  Several years later through work related travel and a couple personal trips, I was able to visit several countries in Europe.  I seem to be able to tolerate their meat so much better than the beef in the US.  I am assuming this is in part due to what the animals are fed and of course not fed.   So when I discovered grass-fed/grass finished beef  it changed my life.  Do your own research into grass-fed beef I was actually surprised at some of the added health benefits to including it in your diet.  (yes I know my vegan friends won’t agree but to each their own).  For me I can digest it, allowing me to enjoy beef once again.

So back to this recipe.  I decided to incorporate the cooking method used to prepare the steak florentine by searing my meat on a grill, only flipping it once, then covering it and allowing it to rest for 15 minutes to finish cooking just slightly and let the juices redistribute.  I secured a beautiful steak from New Life Coffeehouse , Kim has a nice health food store attached to her coffee house offering her own grass-fed beef and a lot of other great items.  If you live in the Sheboygan, WI area it is worth your time to stop in and check it out!

Since I don’t know how to leave well enough alone I decided to marinate my steak in some wine, herbs and garlic like I would picture them doing at one the fancy steakhouses I have visited.  So for the marinade it’s as simple as 1 cup of good red wine (don’t use some crap you wouldn’t drink), a tablespoon of olive oil, a few crushed garlic cloves, a large sprig of rosemary and several sprigs of thyme. Season your steak with salt and pepper then drop it in the marinade.  I prefer to do this in a zip top bag so you can cover your entire steak.  I allowed my steak to marinate for several hours in the refrigerator, if you don’t have that kind of time, let it marinate on the counter for an hour so it marinates as it comes to room temperature.

If you do marinate the steak in the refrigerator be sure to pull it out an hour before grilling. Trying to get a good char on a cold steak does not work very well, and it will mess with your cooking time.

The recommended cut for this steak is a porterhouse, but use what you have access to.  I made this with a grass-fed sirloin and a porterhouse and both were tender and juicy.

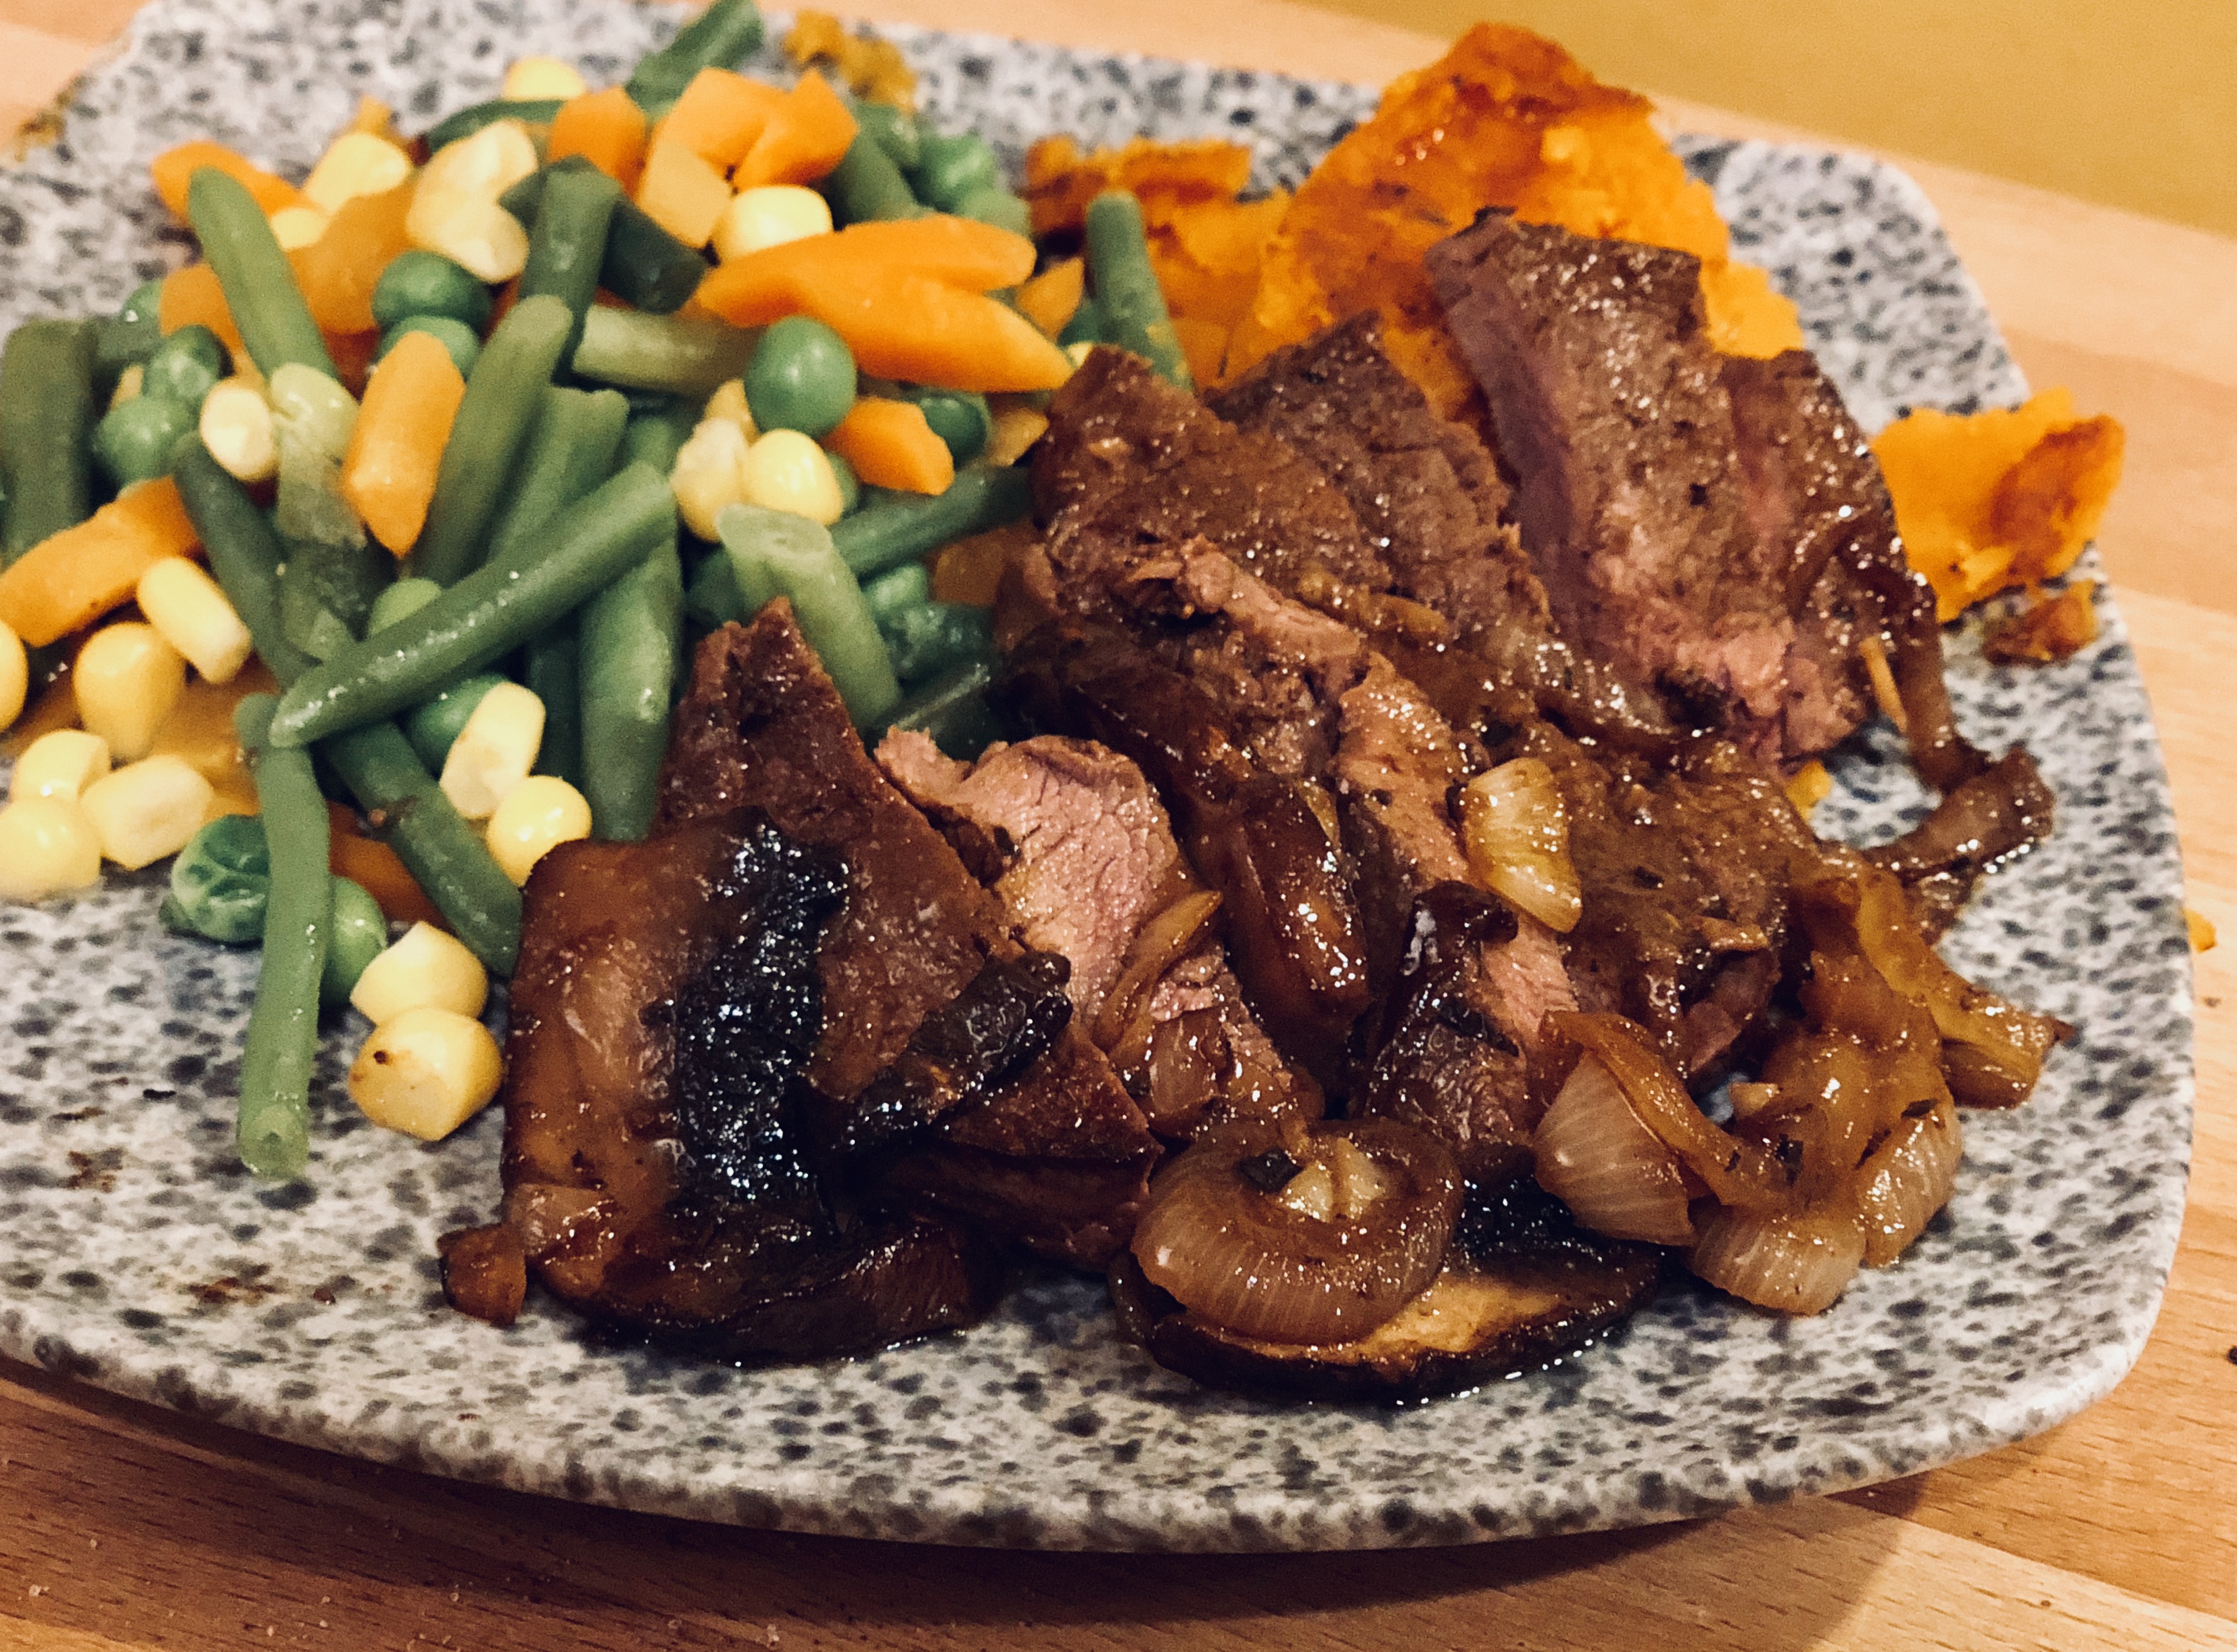
While your meat is coming to room temperature I recommend you prepare the onions and mushrooms.  Heat a pan over medium to medium high heat.  Drizzle your warm pan with olive oil.  Add your onions, mushrooms, garlic and anchovy fillets to the pan and sauté until onions begin to soften.  Add the garlic and cook for another minute until fragrant.  Splash your wine in and allow to reduce a bit.  Remove pan from heat and stir in butter.  Keep warm while you cook your steak.

Remove steak from the marinade and pat dry.  Prepare your grill by building a nice hot fire.  For the fuel source charcoal or wood is best.  If you don’t have a charcoal grill but have a gas grill, hey go for it!  Just a pan, that’s totally fine too.  Cooking is an art, you can change up things to fit you, don’t stress about little things, just relax and enjoy yourself.  Whatever your heat source is make sure it is nice and hot before slapping that steak down to sear.

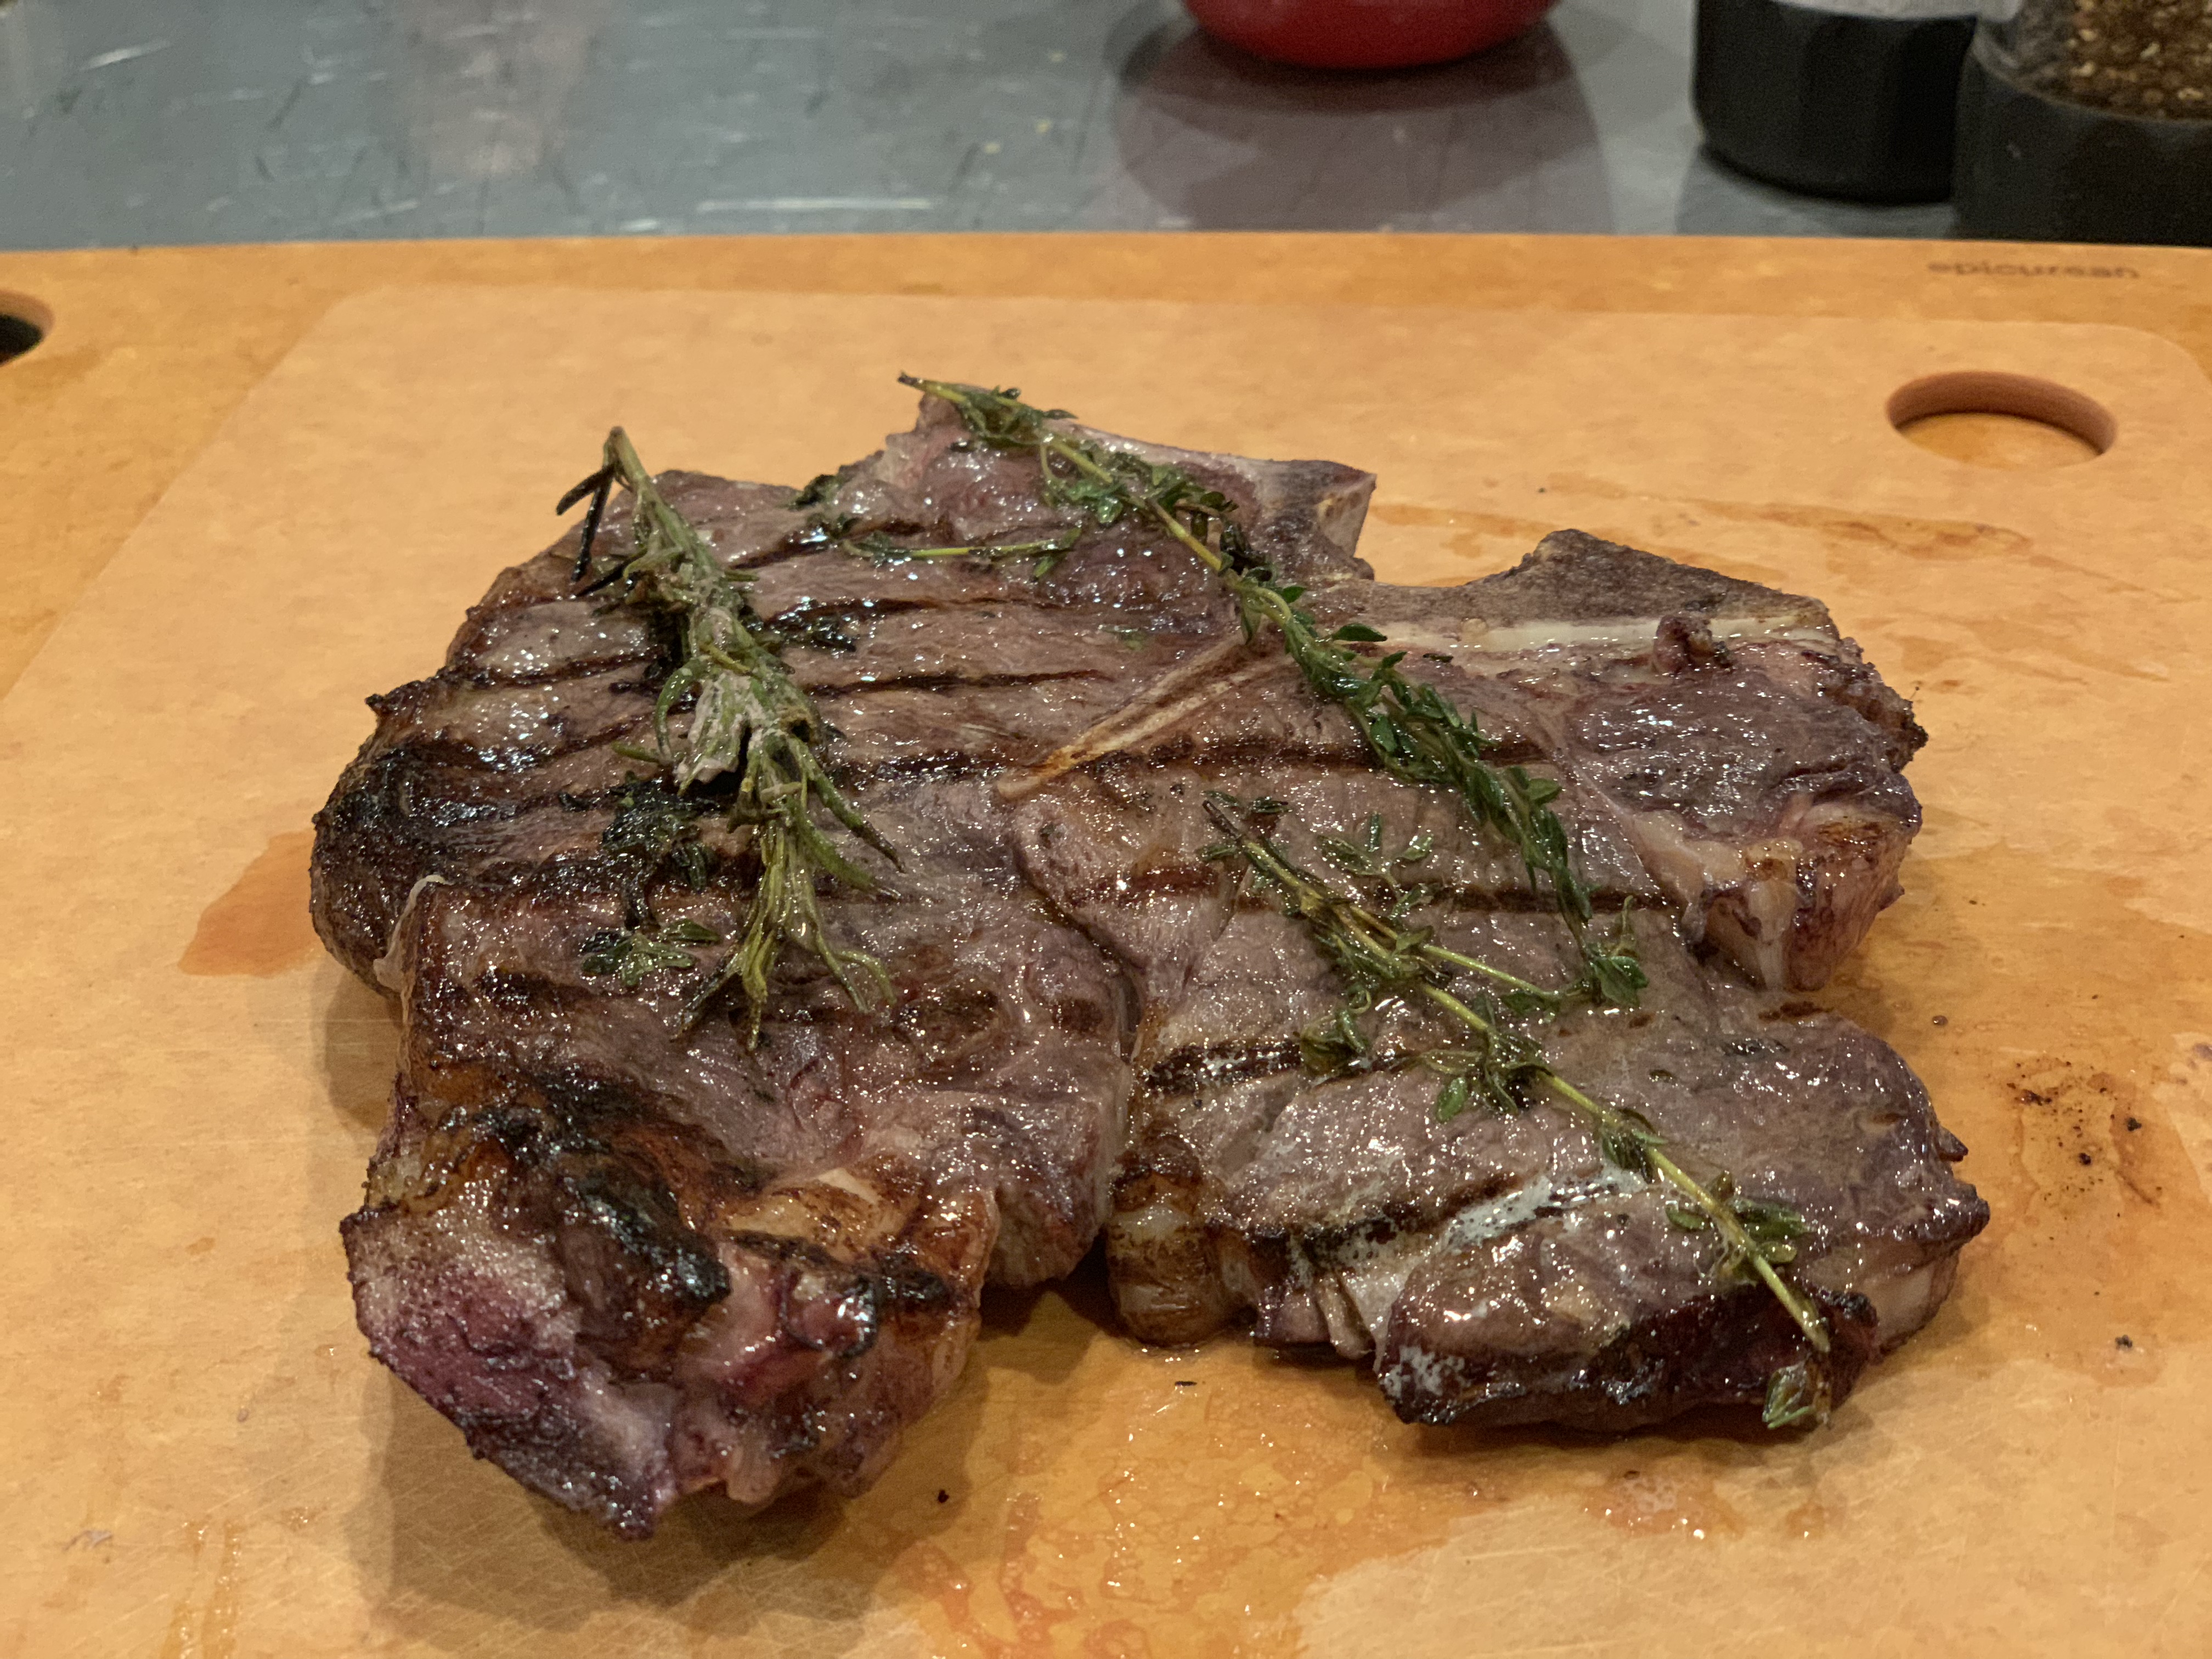
Now sear your lovely marinated steak on each side for 4 minutes.  I did not have a 3 inch steak, mine was about an inch to an inch and a half.  Once you have seared both sides, remove it from the heat, top with the butter pat and cover tightly with foil, allowing your meat to rest 10-15 minutes.  If you are feeling extra spunky today go ahead and mash a few of the leftover anchovy filets into that pat of butter before dropping it on top of your steak.

Serve topped with mushrooms and onions and a good glass of wine and enjoy!


Caramelized Sweet Potato Slices w/cinnamon pecan crumble and warm and spicy chunky apple reduction

Working on Thanksgiving meal plans and need something fun and new?  Maybe you have some guests coming who follow a healthier lifestyle and you are freaking out because your Mom only taught you how to make sweet potatoes with marshmallows on top?  Sorry if you love the marshmallow sweet potato casserole, but I can’t stand it!  Why on earth anyone would ruin a perfectly delicious sweet potato with a crazy amount of sweetener then top it with marshmallows is beyond me.  But hey it’s our differences that make life fun, it wouldn’t be the same if everyone agreed with me!

While I was putting together a menu for a paleo Thanksgiving class, I became super frustrated with the gratin I was trying to make.  So I scrapped it and moved on to this using the exact same ingredients and I am so happy I did!

Don’t let the layering and steps throw you off, this is a super fast dish to make!  While your sweet potatoes roast, the other parts come together and will be ready and waiting.

So let’s get to it shall we?

When I made my sweet potato slices the first time I had a nice fat sweet potato so my slices were nice and round.

The second time I used smaller sweet potatoes and just cut them on the bias (diaganolly) to make a plank that was somewhat oval.  Both of them turned out beautifully so work with what you have.  (see topping step, aren’t they pretty)

You will want your slices to be about 1/2” thick so they can hold all the yummy toppings.  It’s now as simple as rubbing them on both sides with melted oil, coconut sugar, salt and pepper.  Place them in a preheated oven and roast for about 20 minutes.  Now if they need more time, carefully flip them over and roast another 5-10 minutes.  When I used my home oven they took close to 30 minutes, but when I used a commercial oven they were perfectly brown and softened in 20.

While the sweet potatoes are getting their caramelization on, prepare you apples by placing all ingredients in small sauté pan.  Bring them to a boil, then turn the heat down and simmer until they are soft and the liquid has reduced to a thick consistency.

Also while you are waiting for the sweet potatoes to roast and apples to cook, make the cinnamon pecan crumble by tossing the pecans in spices then drizzling with melted oil, tossing to coat.

When your sweet potatoes are done, pile the pecans on the sweet potatoes.  Don’t worry if they fall off, you can straighten them up later, or use the ones that fall onto sheet pan as a garnish.  See no worries, this is totally stress free…


Pop the sweet potatoes back into the oven, with the pecan topping and roast for an additional 5-10 minutes or until pecans are golden.  Don’t go too far or they will burn.

Finally top the whole works with apples, and any pecans that may have snuck off the top of the sweet potato slices.  Arrange on a platter for a pretty presentation.  These can be served warm or room temperature.  Feel free to make them ahead and reheat.  Reheating works best if they are not assembled, but they will still be delicious if time only allows you to build them ahead of time.

I recommend these as a side dish or appetizer, but you could absolutely top them with vanilla ice cream or whipped cream and serve as a delicious fun dessert.

However you serve them, enjoy!

Vanilla Cranberry Orange Smoothie

I love cranberries!  So I am super excited to see them popping up in all the area grocery stores.  I scored myself a bag of fresh organic cranberries today to use in cranberry sauce and was left with 1/2 cup of these babies.  So I ate some (yes I do love them straight, I am unique) then decided to blend them into my post workout protein shake.  Yum-o!!!

For sure I had to add orange, because what’s cranberry without orange?  Zzzzzzzz

So here you go everyone, Vanilla, Cranberry, Orange smoothie.

Place all ingredients in blender with ice and blend.  Enjoy!

Autumn Butternut Squash Crust Quiche with Sausage and Kale


Ahh fall, the crunchy leaves under our feet, the beautiful colors, pumpkin spice…

Sorry to interrupt your daydream but…

I love making quiche as a make ahead meal, it is a great option for a busy night when there is not time to cook.  It’s also a great grab and go breakfast!

For the crust of this quiche I used butternut squash, but you can use any sturdy vegetable.  Think sweet potato, any winter squash, even regular potatoes or beets.

To get started slice the bulb shaped end off butternut squash.  Peel both parts of the squash, and remove seeds.  Slice the long part of the squash into thin rounds, the bottom half into thin slices.  Toss them with salt, pepper and a touch of oil and lay them in the bottom of a pie pan or skillet being sure to overlap them to form the crust.  If there are holes don’t worry, the eggs we add later will help it stay together.

Roast the crust in the oven until squash softens and begins to brown.  Set aside.

For the filling, remove the casings and brown your chicken sausage in a bit of oil.  Alternately you can use cut up breakfast sausage, or fully cooked chicken sausage, just brown it in a pan to get some extra flavor.

While your meat is browning throw in the other vegetables, garlic, thyme, salt and pepper.

Once the sausage is browned and onions, peppers and kale are softened remove from heat and allow to cool slightly.

Crack the eggs into a bowl, season with salt and pepper.  Now add the milk and beat the eggs for a minute or so.  Stir in cheese if you are using it (a tablespoon or two of nutritional yeast would be a great sub for the cheese if you can’t have it) then add in the sausage mixture.  Pour the whole works into your squash crust and bake until eggs are set, about 20-25 minutes.

My kids even enjoy these quiche so I usually don’t mess around with a single batch, instead I double the recipe and use a casserole pan.  Just be sure to adjust baking time accordingly (5 minutes more is the most I have added).  Please forgive my pictures it seems my quiche always gets hit before I can snap a proper shot.

You can make this ahead and serve at room temperature, straight out of the oven or refrigerator, or reheated.  It’s a great grab and go breakfast or a nice make ahead dinner.


Enjoy!


Halibut with Ginger and Scallion en pappilote (in paper)


I thought I should write this post today just for the “halibut”…

Sorry I can’t help it, the bad jokes just run in my blood.  Have you ever wrapped fish in paper and baked it in the oven?  If you haven’t tried it yet, you absolutely should!

There was a day back before I was married that I made Sea Bass topped with green onions and ginger baked en pappilote, then finish seared with oil for a handsome young man.  Almost one year later we walked down the aisle.  Coincidence?  Maybe…

En pappilote is the French term for wrapped in paper.  Of course your dinner guests won’t care what it’s called after they taste this!  The presentation alone is amazing and the the prep time is perfect.  You can put this beauty together in under 10 minutes, pop it in the oven and serve in under 30.

To get started slice your green onions, carrots and bok choy thin.  Your green onions and carrots need to be very thin as you will be only cooking them for 15 minutes.  To achieve a pretty and thin cut turn your carrots and onions at a slight angle before you begin to cut (this is called a bias cut).

After reserving a couple of the green onions for the top of the fish, mix the balance of the onions, carrots, bok choy, garlic, vinegar and honey along with some fresh cracked black pepper to taste and divide among 4 pieces of parchement paper.  The paper should be about 3-4x the size of your fish.

Season your fish with black pepper and a touch of salt, and place on top of your bok choy/veggie pile.

Divide grated ginger and reserved green onions among your halibut filets.

Now to seal your bags, bring two ends together and fold over several times.  Doing each side seperately fold the two remaining sides.  You will need to fold the paper over itself A LOT of times moving a millimeter each time (seriously for your packet to stay together you must keep the folds super tight!)  You are basically crimping the ends.  Side note, if you don’t have parchment paper but do have clean brown paper lunch bags, you can rub them with oil and use them in place of the parchement.  Just please keep an eye on your oven, obviously all paper is flammable including parchment!

Once you have the packets of fish/veggies sealed place them all on a sheet pan and bake them in your 400 degree oven for about 15 minutes.

While your fish is baking heat the oil on the stove until barely smoking.

Place a package in front of each guest cutting the bag open in front of them pausing to let them enjoy the delicious smell, then sprinkle the filets with sesame seeds.  Using a ladle carefully drizzle the hot oil over the entire surface of the fish.  It will sizzle!  Be careful not to burn anyone!

Enjoy with rice or roasted potatoes and a nice fresh salad.  Your friends will think you are now a master chef and you did it in 30 minutes!

Now it’s time to sit back, relax and enjoy the compliments!  Cheers!

When you make this snap a pic and share!!  We love to see pics of your dishes!


Seafood Paella With Chorizo

We always love our visits to Spain visiting some of my favorite family.  Walking along the boardwalk in Marbella along the Mediterranean is truly beautiful and unique.  There are shops on one side and chiringuitos (beach restaurants) lining the other.  The warm sun and smell of the salty Mediterranean…I need a plane ticket right now!!!

After enjoying several different paella dishes over the years I finally asked one of my favorite Spaniards, Eusebio to show me how he makes paella.  In case you haven’t been introduced Paella is a rice dish scented with saffron.  It isn’t unusual for people to prepare it outside, actually everywhere we enjoyed it this is where it was prepared.  I did change Eusebio’s recipe a bit, but I am sure he would approve!  (If not I am sure he will let me know 🙂 )

Generally you find paella either straight seafood, or with meat.  The dish Eusebio prepared for us was made with rabbit and chicken.  It was sensational!  Since I enjoyed it so much and wanted to bring this tradition to my area of the world, I threw a paella party class at our local culinary store Relish where I am occasionally featured as the chef of the evening (even a morning or afternoon once in a while).  For the class everyone was involved in the preparation which made for a great party!  Why not try it with some of your friends!?!

For this paella I went with seafood and chorizo.  Mussels, clams, shrimp…yummy!!  I am using a 20 inch paella pan, you can find them on Amazon or most kitchen supply stores.  If you don’t have a paella pan, you can try to use any large frying pan or sauté pan, but chances are you won’t be able to achieve the “soccarat” or crispy bottom of the rice that paella can be known for.  No worries, it will still be delicious!

A quick note about the chorizo, you must use Spanish chorizo not Mexican chorizo.  Spanish chorizo comes in links that are already smoked.  Mexican chorizo is raw and generally is a very fine crumbly grind. Don’t get me wrong Mexican chorizo is delicious too, but the two are not interchangeable.

To get started we need to render the fat out of the chorizo and crisp it up a bit.  Do this by heating your pan over medium high heat, if you have a larger paella pan you may need to use more than one burner.  You can also do this on your grill if your pan fits, or if you are really lucky and own a large outdoor burner that is also great!  Once your pan is warm, drizzle in the olive oil.  Swirl it around to coat the bottom of the pan and add your sliced or diced chorizo.  Sauté the chorizo until it begins to crisp up, then remove it from the pan with a slotted spoon and set aside.

Now add your sofrito, which would be your carrots, onions, garlic, tomato, peppers and herbs.  “Fry” your sofrito in the delicious olive oil/chorizo fat and watch it soak up all of those delicious flavors while it develops an amazing flavor, be sure to add a bit of salt and pepper at this point taking it easy on the salt, remember stock is salted as is the chorizo.  By this point your house (or backyard it you are cooking outside) will smell super amazing.  Make sure no one walks in and steals your plate of chorizo…

Once your vegetables have softened and soaked all the delicious oil they can, grab a large pinch of saffron and add it to the party.  Then follow it with your rice.  Bomba or calasparra rice is preferred but if you can’t get your hands on that, use arborio.  It is somewhat similar in grain size.  Stir it around making sure to coat all the grains with that deliciousness you’ve created so far!  Hit it with some white wine and give it a moment to simmer out.  A good Spanish white is preferred.

Add half of your stock to the pan give it a stir and then throw your spoon in the sink.  No more stirring from this point forward!  Seriously don’t stir, resist the temptation.

Allow your rice to cook for about 10 minutes, then add the balance of your stock reserving about a cup.  Keep that cup close in case you need it.  Depending on which rice you buy and how accurate you were measuring the rice you may or may not need it.

Now it’s party time!  Grab all the ingredients and decorate your pan.  Lay the seafood in the way you want it to look when you present your gorgeous, delicious creation to your friends and family.  Follow with the strips of roasted pepper, then scatter the peas and chorizo around it all.  (Picture courtesy of my recent class)


Now grab a piece of foil and lightly cover the pan creating a little steam to help those shellfish open up.  Your dish should be done within 10 minutes.  Test the rice after about 5 minutes making sure the pan isn’t dry.  If all the liquid is absorbed and your rice isn’t soft add the last cup of stock.  Keep an eye on the seafood throughout cooking.  When the shrimp are pink and most of the mussels and clams have opened check your rice.  Adjust seasoning if needed.  At the last moment crank the heat up to high.  Give it a minute or two.  Hopefully you were able to get that nice crunchy bottom layer.  It is amazing if you can execute it correctly.  Admittedly I still struggle with it from time to time.  Hey who’s perfect? Once your dish is complete top with fresh parsley and some lemon wedges for serving.

I added a bonus pic for you below.  In the event you can’t access clams and mussels or they aren’t your bag, try it with shrimp and scallops.  It is super delicious this way too!  Either way grab a good bottle of Tempranillo and a chair at the table with your friends and family and enjoy!


Sheet Pan Roasted Fish with Broccolini and Crispy Potatoes

Sheet pan dinners!  So easy, simple and delicious!  Life gets so crazy it’s nice to have these type of meals in your back pocket to pull out when you are short on time.  The options for meat vegetable starch combos are endless.  The best part is cook time is about 20 minutes, prep time is 5-10.  A gourmet meal on your table in 30 minutes making this a great weeknight option or a beautiful meal for entertaining.

In today’s recipe I used broccolini, baby red potatoes and turbo (a somewhat firm whitefish.)  In a recent class I taught we used wild salmon and it was equally delicious. The results were so yummy (picture below) that one of my students headed to the grocery store after class for salmon.  She had plans to prepare it for dinner for the following night!


So grab your sheet pans, some parchment paper, your favorite vegetables, a nice piece of fish (or a chicken breast, adjust time accordingly) and let’s do this!

Preheat your oven to 450 degrees Fahrenheit.  Line a sheet pan with parchement paper.  Parboil your baby red potatoes in salted water for 15 minutes or until they are almost done.  You don’t want them to be fully cooked or they will be over cooked once you broil them.

Place your fish cut into equal sized pieces, I cut my salmon into 4” chunks, in the middle of your pan.

Place potatoes next the fish and season with salt and pepper.  Smash the potatoes down with a potato masher.  If you have some aggression to get out use a meat mallet.  We decided to use the latter in the class I was teaching.  It was way more fun than a masher!

Lastly place the broccolini on the other side of the salmon.

Combine oil, garlic and herbs along with some salt and pepper.  Top the potatoes with a little more than one third of the garlic herb oil.  Do the same with the salmon, then use the remaining oil to season the broccolini.  You should use most of the oil between the fish and potatoes.  Toss the broccolini to coat.

Roast in preheated oven for about 20 minutes  or until potatoes and broccolini are nicely browned and fish flakes easily with a fork.  If dish is finished before the rest just pull it off the pan and finish cooking the rest.  I had to remove the tail portion of my salmon about 5 minutes early as it was thinner than the center cut pieces I had.

Place everything on a pretty platter and serve, or just take it right from the pan.  Either way enjoy!!  Cheers!


Spiralized Apple Crisp with Date Caramel

Crisp, is one of the easiest desserts in the whole world!   In fact when my kids ask for pie I always try to convince them crisp is better.  Don’t get me wrong I can make pie crust, but I really don’t have a lot of time on my hands so…crisp is my go to. The hardest part of this Apple Crisp is prepping the apples, and since that isn’t hard at all that makes this dessert easy as pie…ahem crisp.

I chose to spiralize my apples for this crisp, feel free to use sliced apples if you prefer.  The spiralizer is perfect for apples as you don’t even need to core them!  Just secure in your spiralizer and crank away.  In a recent spiralizer cooking class I taught I really loved this spiralizer by OXO.  In a recent spiralizer cooking class this spiralizer secured to the counter top better than its competitors making it easier to use.

Once your apples are prepared and ready to go toss with the balance of apple ingredients and pile in an oiled baking dish.  You’ll see I haven’t used any refined sugar in this recipe (and most of my recipes…). Instead we are replacing all sugar with coconut sugar.  It has a nice almost molasses flavor and has been shown to not spike your glycemic index the way that refined sugar would.

With your apples all spiralized and ready for fun, mix all crisp ingredients together and top apples with it spreading evenly being sure to fully cover apples.  Spiralizing your apples also make this a super fun dessert for kids as it is like eating apple noodles if you don’t trim them.  If longer spiralized apples isn’t your jam, no worries go ahead and snip them with a pair of kitchen shears as you finish spiralizing.

When it’s all put together,  bake in a preheated oven until apples are tender and bubbly and crisp topping is golden.

Top with my homemade salted vanilla date caramel sauce and whipped cream or coconut cream and enjoy!  Dessert is served, guilt free!!

Crunchy Korean BBQ Chicken Wings Instapot


I know what you are thinking, crispy chicken wings from a pressure cooker? Lady you are nuts! But hey don’t stop reading I promise you will be impressed. My husband was blown away thinking I fried them.
It’s super easy too…and fast too!

If your wings aren’t split, cut them apart. Also now would be a great time to trim off any excess fat that may be hanging off your wings.

Place the metal trivet that came with your pressure cooker (if you don’t have a trivet you can grab yours here) and place it in the pot. Salt and pepper your wings and place them on the trivet in layers.


Add one cup of chicken stock, or just water if you don’t have the stock, but the stock adds some great flavor so it’s worth it! Seal the lid on your Instapot and set to manual cook 9 minutes.

Preheat your oven to broil.

While you wait for the wings to cook prepare the sauce. Heat a small saucepan over medium high heat. Drop the coconut oil in and once melted add the garlic and allow to sauté for a minute or two. Be careful garlic burns super fast. Now add the balance of ingredients and allow to simmer while your wings are becoming amazingly juicy.

Once the pressure cooker is done, do a quick release by flipping the top to vent.

Drop your wings in the sauce tossing to coat.
Place wings on a sheet pan prepared with foil and allow to broil for about 6 minutes. Flip over and broil another 2-3 minutes. Be careful, after the first 6 minutes you may need to lower your rack as the sugars in the sauce can get a bit smokey.

Remove from oven, give them another toss in the sauce and serve with celery sticks and blue cheese if you wish. I had to make a second batch right away as they disappeared pretty quickly after I made them…
Cheers!

Smokey Spice Rubbed Venison Chops with portabella mushrooms and onions

I would be lying if I said I wasn’t excited for this post!  In the area of the country we live in hunting is very prevalent.  If the season works out in our favor we end up with venison in our freezer to enjoy throughout the year.  What does one do with this meat?

People tend to find venison challenging to prepare, I am guessing this is because though it is similar to beef it has a finer texture, a lower fat content and a higher water content.  What do I do with this meat I asked myself many, many years ago.  When I inquired people gave me recipes that seemed to cover the meat flavor.  It was almost as if people were eating it begrudgingly, and force feeding it to their children.  Even the hunting magazines would recommend making beautiful backstraps into chicken fried steak with butter cracker crumbs.  If that is how you enjoy it, I am happy for you.  If you want to try something new, keep on reading, I promise it will get awesome…

Today we are preparing chops.  Venison chops are cut from the rib area of the deer, this tender meat runs along the spine. Sidenote… In the event you don’t enjoy or have any venison feel free too substitute lamb or grassfed beef either rib or shoulder chops for the venison.

Alright, lets do this!  My chops were beautifully butterflied and ready for me to work with, so I grabbed my trusty spice blend (see recipe below), it contains smoky, sweet, earthy and savory elements, think smoked paprika, cumin, thyme, coconut sugar (or brown if you prefer), thyme…and seasoned them on both sides.  Crushed a couple of garlic cloves, sliced a sweet yellow onion, and sliced up a portobella mushroom I had hanging around.

Next step heat that pan up.  I grabbed a sauté pan, in retrospect a cast iron pan probably would have brought it up even another level.  Heat your pan over medium high heat.  When your pan is hot, drizzle in about a tablespoon of extra virgin olive oil, add your chops and sear for 3-4 minutes.  Don’t touch the chops once you put them in the pan until the 3-4 minutes is up.  This is super important as if you begin to shift them around, they may stick and you will ruin the beautiful crust you are trying to achieve.

Once they are nice and browned on the first side, give them a quick flip to sear the other side.  Once you flip them add the onions, garlic and mushroom to pan around the chops and continue to cook for an additional 3-4 minutes again not moving the meat.  You will have to move the garlic, onion, mushroom mix around a bit to keep it from burning.  After you sear the second side, flip your chops once more time, that makes 2 flips, add the wine to the pan and allow to reduce by half as your chops finish cooking, approximately 2 minutes.  Remove the chops from the pan place on a warm serving platter, pour everything from pan on top scraping any browned bits off.  Don’t leave all that extra yumminess behind!

Allow to rest for about 5 minutes under foil.  Your chops should be medium following this time guideline.  If you prefer them more rare, or more well done make adjustments accordingly (+ or -1 minute at a time until desired temperature is reached).

No joke, my kids inhaled this as did my husband.  No nagging was involved, no bribery, no convincing.  Just straight up silence as they chewed.  Silence is golden as we all know especially when your house is a zoo, like mine.  Don’t get me wrong, I love my kids and know these are the glory days, and someday, sooner than I realize my house will be quiet again.  Yet sometimes just a nice peaceful dinner is nice.  In the spirit of a traditional midwest family dinner, my plate has mixed veggies and some lovely roasted squash.  I seasoned my squash the same as the venison with my smokey spice blend and roasted it until it was golden.  As for the fancy (okay they weren’t) veggies, just a quick steam and a grind of sea salt and black pepper, topped with a little butter.  Cheers!

I hope you enjoy your venison more after this post!  Feel free to reach out to me if you want more tips or tricks.  If you make this add a picture or comment to the post, I always love to hear from you!


  • 1
  • 2
  • 3
  • Next Page »

Meet the Author

MaryJo is a busy mom with 3 beautiful children. She enjoys paddle boarding, kayaking. and cross country skiing. She loves food...cooking it, eating it and especially sharing it with everyone.

Connect With Me

  • Facebook

Copyright © 2025 · Foodie Pro Theme by Shay Bocks · Built on the Genesis Framework · Powered by WordPress